Showing posts with label Cricut. Show all posts

Nov 14, 2014

NOEL

It feels good to create again, even if it is something as simple as a card and this week I actually made two projects....WOOT! I'm on a roll!

I have had scraps of 4 x 4 pieces of paper with circles cut out of them from a previous project sitting on my desk for over a month. I didn't want to part with the negative pieces for a couple of reasons.....I had too many and knew they would come in handy AND I loved the DP. As soon as I saw the challenge at PDE I thought they would be perfect for a banner. Then I saw this week's sketch at DS#177 and knew this project was meant to be. This is what I came up with and I have the perfect place in mind for it...just in time for the holidays!


The letters where cut from the Cricut Storybook cartridge and pop-dotted. The Santa image is from a $1 JoAnn stamp and wet embossed with white opaque EP. Mesh bling, glitter, ribbons, twine, circle Nesties, scallop punch, CS, and mat board were used. Check out the felt covered jingle bells that I found at Michael's a few years ago which are hanging off of a TH swivel clasp. This bow would never exist without a Bow Easy.

Seriously, if I know I'm going to put glitter on a project why wouldn't I just use glitter paper instead of running it through a Xyron and pour glitter all over it? I asked myself that twice this week.


CHALLENGES:
PDE (Linky party): Banners
Anything But a Card: #41 Anything Goes
Hiding in My Craft Room: #173 Super Scraps Saturday
Deconstructed Sketch:  #177 ( sketch used for the letter O)


I love these challenges, they keep me motivated!
Happy Friday,
happy weekend.

Aug 25, 2013

Y&FH CH #22 Photo Inspiration

Happy Sunday! I have a quick reminder that you still have a few more days to join the current challenge that's going on right now at Y&FH....which is this inspirational cake photo with it's bright colors and gorgeous flowers.

 
  • One of the biggest changes to Y&FH bi-weekly challenge rules are that you can now use ANY stamped image!
  •  As a bonus for using a Y&FH image,  your name will be added a maximum of one (1) extra time after the last linked entry.
  • All projects/cards must have a hand-colored image, "sentiment only" cards are NOT allowed.  
  • One (1) entry per person.
  • All of the challenge rules can be found HERE.
 
The winner will receive a $15 gift certificate to the Yumi & Fumi Handmade online store and the Top 3 will receive a 10% discount code to be used in the Yumi & Fumi Handmade online store.

We would love to have you join the Y&FH "Photo Inspirational" challenge!  Feel free to scroll down or click HERE to find the original challenge post and link your entry.  The winner and Top 3 picks will be announced on Saturday, August 31st.
 
Thanks for stopping by and leaving a comment or two, it's always nice to hear from everyone during these hectic back-to-school days!

Jan 1, 2013

Fumi Panda and Happy New Year!

 
Happy
Happy
New Year

Once again, I can't say how excited I am to be the January GD at Yumi & Fumi Handmade....these really are some of the cutest images, and every time I see them I always smile. I've been wanting to use Fumi Panda for a while, and I knew exactly what I was going to make with this cutie....a(nother) journal.

 
I made the background paper on the computer because I wanted to personalize this with one of our favorite family stories...that the first time we took our youngest son to Panda Express he started to cry and told us, "I don't like panda meat."  Too cute!
 
I've been waiting for the perfect project to use these beads to make a charm....if you look closely you'll see a glass panda bead.  There are also a couple of wooden beads with kenja symbols that I found at OTC. The Ying/Yang symbol was made using my Pagoda cartridge.


 Copics:
Skin: E000, E00, E11, R20, R22
Hair, Eyes: E33, E35
Costume: N1, N4, N8
 
Thanks for stopping by,
I wish everyone a happy and healthy 2013!
:Dxx

Dec 14, 2012

Nativity Candy Wrappers

For some reason I've created numerous reasons for myself to craft this holiday season...I think it's because I decided a couple of months ago that I've spent my fair share of money on crafting supplies and I should use them more often.  That could be one of the reasons, but it could also be that I just like to create?!!

I needed a quick and inexpensive gift for a  handful of 7th graders who come to the house every Wednesday for CCD class, and as this week's class was the last one until after the new year I needed to make it pronto.   I grabbed some large sized Hershey Bars ($1.50 ea at Target) and my Cricut Inspired Heart cartridge and this is what I came up with:


I think the candy wrappers look plain in the pictures, but when you see them they shimmer and shine perfectly as glitter paper and Spica glitter pens were used in all the right places.

I used the Inspired Heart cartridge for the nativity silhouette and it's shadow, both were cut at 3.5".  Both sentiments were stamped using  Heartfelt Creations Wisemen Pre-cut set, and the star stamp is over 15 years old. Ribbon and raffia were added. I wanted these to look nice but didn't want to put too much time into making them because I knew the kids would really just want the chocolate...like a 13 year old would say no to chocolate?!!

I'm entering this post in the Anything Goes Challenge that's going on at The Kraft Journal.

Thanks for taking the time to stop, read, and leave a comment....it's nice to be among friends.
:Dxx

Oct 31, 2012

WW #56 Cover Your Head & Happy Halloween!!

 
****************************************
 Please scroll down for this week's FBW OPEN challenge. 
****************************************
 
Wicked Wednesday has a fun challenge that starts today and runs through next Tuesday evening which is called COVER YOUR HEAD....which includes things you wear on your head or in your hair, such as feathers, headbands, flowers. I used the Girls Gone Fishing image from Stitchy Bear who is our sponsor, and they are offering one random winner a $10 gift certificate to their store this week. SWEET!
 
 
After several failed attempts at a Shark Week theme I set everything aside and walked away from my craft area. I woke up in the middle of the night remembering I had fishing hook brads....perfect! I also used a measuring tape sticker because we all know how fishermen like to tell stories about the "big one" that got away...my dad fished for years so I'm familiar with like stories, lol!
 
I hope you find a few minutes in your day to join us in this super fun challenge, feel free to link-up HERE!
 
****************************************
 
 Happy Halloween! I love making small projects....little things I can make in a couple of hours and not have to think too much about. For some reason, I was able to make quite a few of those this Halloween. 

I love making treat bags and my kiddos love them too!

When I went to my sb'ing retreat a couple weekend ago, I made this fun and not too spooky wreath using Happy Hauntings, Chic and Scary, and Indie Art cartridges with lots, and lots, and lots of tulle tied around a wire wreath form.

(This took more than a couple of hours to make!)
 
Halloween stick pins inside handmade ATC boxes were sent to a few friends...I sure hope they like them!!!


Lastly, a couple of Halloween cards that I made for the kiddos using zombies and floating eyeballs. 


Thanks for stopping by and I hope everyone stays safe and is blessed with more treats than tricks today.
:Dxx
 

Sep 27, 2012

Happy 18th Frankie!


We have another birthday celebration coming up soon...our daughter is turning 18 next week!  I wanted to make sure this was completed and ready to go before her birthday, as last year I was late in making her card and she was very upset with me and muttered something about "the shoemaker's kids." She's a total goofball about anime and manga and even has a few characters that she draws herself. I personally think she's super talented and have asked her a few times to draw images for specific projects for me...if she actually does get around to drawing them I'll let you know. I can't believe we'll be taking her on college visits this coming month.

 
I started making this banner a couple of week's ago hoping to enter it into a couple of challenges but was sidetracked by a few birthdays, along with out-of-town guests. I'm not complaining tho...it was great to see my sister again as it's been since  spring since I last saw her. I added kanji and flowers from the Pagoda cartridge, and the number 18 is from the Mickey & Friends font cartridge. The girlies are from the newest Sister Stamp release and all  DP is from the MME Penny Lane line.

This is the matching card made with a few leftovers...such as the negative from one of the flowers and an extra butterfly I didn't use on the banner.


Stamps:
Sister Stamps: Mariko (w/ present), Miyoko (w/ cupcake)
Hero Arts: Arigato
Stampin' Up: Take a Spin

Challenges:
Yumi & Fumi Handmade: #3 Anything but a Card
Simon Says Stamp: Anything Goes
Through the Craftroom Door: #37 Sept 25th - Oct 1st
Use it Tuesday: Use Your Scraps, here's how:
All images were stamped on odd sized scraps and then fussy cut.
The flowers were cut with DP scraps left over from a project from 3 years ago.

Thanks for stopping by and leaving all of the sweet comments that you do, they really are a bright spot in my day.
:Dxx

Sep 1, 2012

Wicked Wednesday - Back to School Reminder


Here's a quick reminder that you have until 7:00 pm Tuesday evening to join us in the Back to School challenge that's going on over at Wicked Wednesday. You know we'd love to have you join us in these fun little challenges, afterall...an ATC is only 2 1/2 X 3 1/2 inches.

I've been on a "I have to use up what I have" mission lately and believe me, there's a lot in my craft area that needs used up! Like this DP that has a school bus border...I've had it for almost 12 years. How do I know it's been 12 years? I bought it the year we moved into our new house and today is our house's 12th birthday!

The apple and book are from a swap I was in a couple of years ago at SP and is from the Hello Kitty cartridge.
The gold stars are leftovers from previous cards.
The alpha beads have been around for a few years.

********************************************************

If you are wondering....we are going to have cake tonight, we'll put 12 candles on it and sing happy birthday to our house. Then I'll take pictures of the house, like I do every year, to put in the photo album. There'll be a front view and any home improvements to archive the year's changes, afterall....it is part of our family.
:Dxx

Aug 29, 2012

FBW#203 Decorate the Inside of a Card

Please scroll UP for this week's Wicked Wednesday ATC challenge:
Back to School

*********************************************************

This week's challenge at Flutter By Wednesday is to decorate the inside of your card! While we all know that there are times that we just don't want to take the time to finish them, I've personally learned from past experiences that it's ALWAYS best (for me at least) to finish the inside of the card at the same time I make it. If not, it's inevitable that I end up misplacing the last few remaining scraps that were left over and have to use mismatched dp for the inside.


This card was made for one of the sweetest, peace lovin' gals you could know named Jenn, and she is one of those people who I'm more than thrilled to be able to call my "friend." Boho Anya from TGF was used, along with my Feeling Groovy Cricut cartridge and a couple of MS butterfly punches. This adorable sentiment from Inkadinkado seemed like the perfect way to complete this card, along with a few more butterflies and a little gingham ribbon.


We'd love to have you join us at Flutter By Wednesday for this week's challenge, all you have to do is have a butterfly or fairy on your creation. You can link up HERE and while you're there, you can also see the awesome cards my fellow teamies have designed.

Hope you have a fluttery kind of day!
:Dxx

Jul 23, 2012

4, 3, 2, 1....

4 Challenges combined into
3 Cards, made in
2 days for
1 Blog

This isn't something I like to do...putting so many different challenges in one post but if I don't do this today, I'm going to run out of time by the end of the week to get all of these posted. Also, our internet/cable/phones have been wonky from a storm this morning and there are more storms expected over the next couple of days, so let's just get this started....

The Kraft Journal and Here Come the Boys:

Awww, I just love this lion image but have to be honest and tell you I'm not sure who it is by as it's one of my sister's stamps. The animal print buttons and background stamps are from OTC...they are a few of those things that when you buy them you just know that they are going to come in handy one day, LOL. The Kraft Journal's challenge is Make me Smile and Here Come the Boys challenge #32 is to make a Jungle Themed card....put them together for Wild for your Smile.


Dilly Beans:

This next card is for the Orange and Pink challenge over at Dilly Beans. You might be looking at this saying "where's the orange and pink?"....look at the image, it's there! After coloring the image on white paper I colored the background with various pink Copics and striped it with flourescent orange. When I originally finished making this card it didn't have the blue bird on it and it was pretty plain looking, so I went looking through my charms to find a bird but couldn't find one. Then I remembered I had some bird cuts from a swap I had made a few years ago...OMG, this swallow couldn't have been a better fit. Inside the card is sentiment from a stamp I found at the Goosebarn, it reads: LET YOUR DREAMS FIND WINGS...how perfect is that?!


The Greeting Farm:


My third and LAST card uses Cheeky Beach for TGF's FFF Summer challenge, the Cheeky Cherry girls are some of my fav's to color. This is my second attempt at coloring images with very light lines (I used Momento Angel Pink ink) and as you can tell, I still have a looooooooong way to go to master this technique. It's a gorgeous watercolor look when it's done correctly! There are lot's of tutorials on the no-line coloring technique, this tute is from SCS....hope you give it a try.

Whew, finally done! I know it's been a long post and I really do appreciate how you've read through it all...or maybe you took a little siesta and just left a comment?! LOL, either way, thanks for stopping by....hope you have a great day.
:Dxx

Jul 4, 2012

A couple of cards/challenges in one post!

It's the 4th of July and this is my 2nd post for the day...I'm just trying to get these posted/entered in time before some of the challenges end, as lately I've made cards and have forgotten to post them for the challenges I made them for...DOH!

I did get the chance to make this card for our niece who turned 12 over the past weekend...don't you just love the sas on TGF's Creeper Leslie! I couldn't believe my luck at how well the birthday brads matched as they've been sitting in my stash for a good couple of years. I'm entering this in the
Anyone For Anya: Just Use It challenge.


My second card had me saying Grrrrrrrr! Have you ever bought a crafting tool and wondered why you bought it?!! That was me while I was trying to get this card finished for an 80th birthday party were heading to in a few hours. I know why I bought my Provocraft Gypsy, but wish I would use it more often so I wouldn't forget the basics on how to use it...such as welding and contour hiding. I had a couple of hours to get this done...simple, right?!! I mean, all I wanted to do was weld 8 and 0 together, and again in Shadow. I sat down to watch a youTube 101 tutorial for the Gypsy and the girl said, "press this pretty little button...." Grrrr! Not what I wanted to hear at the time! All in all....my Gypsy survived my little temper tantrum and I have vowed to use it more frequently from here on out!


The number 80 was cut and pop-dotted a couple of times and the image inside the 0 was stamped and wet embossed. The sentiment says Happy Birthday in Italian...perfect for a man who travels back to visit his relatives in Italy every year. I'm entering this in Here Come the Boys: Metal and/or Embossing challenge.


Thanks for stopping by and leaving such sweet comments, it's always fun to hear from those who share my love for ink and paper!
:Dxx

Apr 5, 2012

SPRING Banner

Here's a banner I made to celebrate SPRING...light, bright, and pastel-ly-ish!

I started by using my Sizzix Banner Pendant dies, both the Plain and Scallop sets with white cardstock and kraft paper. Then I sewed the DP onto each pennant using a zig-zag stitch.

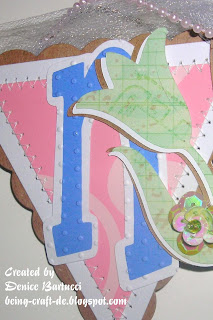
I love the siloutte shapes on A Childs Year cartridge and decided to put one on each end, along with the little girl holding a basket in the center...all were cut at 5 inches. I shadowed all 3 images and popped them. I cut each flower three times and used Kraft paper for the final layer for a makeshift shadow as the ICON images on the ACY cart doesn't have a shadow feature. I cut the duck three times and popped each layer, then added a googly eye.


The word SPRING was cut using the Feeling Groovy cartridge and I used my all-time favorite feature on most cartridges...the shadow feature, lol! I then ran all the letters through my Cuttlebug using the Swiss Dots embossing folders.

The butterflies are from two different MS punches and I used Viva Pearl Pens to add the pearl dots on the inside of each butterfly.


After adding a couple sequined flower embellishments onto the flowers, I ran tulle and a string of pink pearls through the holes I punched at the corner of each pendant and tied a loose knot in the tulle at each end of the banner. I think the Tulle adds softness to the banner and is perfect for hanging it too!


Here's the entire banner:


It just dawned on me that I didn't use any ink on this project...I seriously think that this is a first for me!

Challenges:
My Kraft Journal: Celebrate Spring or Easter
Paper Playtime: #71 April Showers

Thanks for taking the time to stop by and visit and/or leave a comment...both are appreciated and brighten my day!
:Dxx

Mar 25, 2012

Favorite Peep

I've been wanting to break-out my Cricut lately and needed to make a little "something" for Easter...so when I saw this adorable tag on A Child's Year cartridge I knew it was the cut that was meant to be.


Lot's of fun details, and my DIY sticker turned embellishment is the butterfly. After putting the sticker on cardstock I used my Epiphany Shapemaker which punches a circle shape and adheres the bubble cap over the image, all at the same time...I LOVE IT and use it, all the time!!!

A banner, spring border die, rub-ons, flowers, stickers, Viva Pearl Pen, Glossy Accents, and a googly eye...


I cut the tag base once and the chick two more times so I could pop-dot them. A little TH Distress Ink and Glossy Accents on the feet and beak completed this cut.


Challenges:
365 Cards: Day 22 - DIY
Exploring Cricut: It's a Spring Thing
My Sheri Crafts: #81 - Easter

Cricut:
A Child's Year, pg 33 Easter2 Tag

Thanks for stopping by, it's always fun to chat with friends.
:Dxx